Original Link: https://www.anandtech.com/show/6241/building-the-2012-anandtech-smb-soho-nas-testbed
Building the 2012 AnandTech SMB / SOHO NAS Testbed
by Ganesh T S on September 5, 2012 6:00 PM EST- Posted in
- Storage
- IT Computing
- NAS
Introduction & Goals of the Build
The market for network attached storage (NAS) devices has registered huge gains over the last few years. In keeping up with the market trends, the coverage of NAS units has also seen an uptick on AnandTech since the middle of 2010. Followers of our NAS reviews have seen the standard Intel NASPT benchmarks and file transfer test results along with a qualitative coverage of the NAS’s operating system / user interface. The reviews briefly touch upon miscellaneous factors such as power consumption. The feedback from the readers as well as the industry pointed towards some essential NAS aspects such as performance under loading from multiple clients being ignored. Towards the end of 2011, we started evaluating approaches to cover these aspects.
Our goal was to simulate a SMB (Small to Medium Business) / SOHO (Small Office / Home Office) type environment for the NAS under test. From the viewpoint of our testing, we consider a SMB as any setup with 5 - 25 distinct clients for the NAS. Under ideal circumstances, we could have had multiple PCs accessing the NAS at the same time. However, we wanted a testbed which didn’t require too much space or consume a lot of power. It was also necessary that the testbed be easily administered. These requirements ruled out the possibility of multiple distinct physical machines making up the testbed.
In order to set up multiple virtual machines (VMs), we wanted to build a multi-processor workstation. One of the primary challenges when running a large number of VMs on a single machine is the paucity of resources. It is important not to be disk bound. Therefore, we set out with the intent of providing each VM with its own processor core, physical primary disk and network port. After taking a look at the options, we decided to build a dual processor workstation capable of running up to 12 VMs. In the first four sections, we will take a look at the hardware options that we chose for the build.
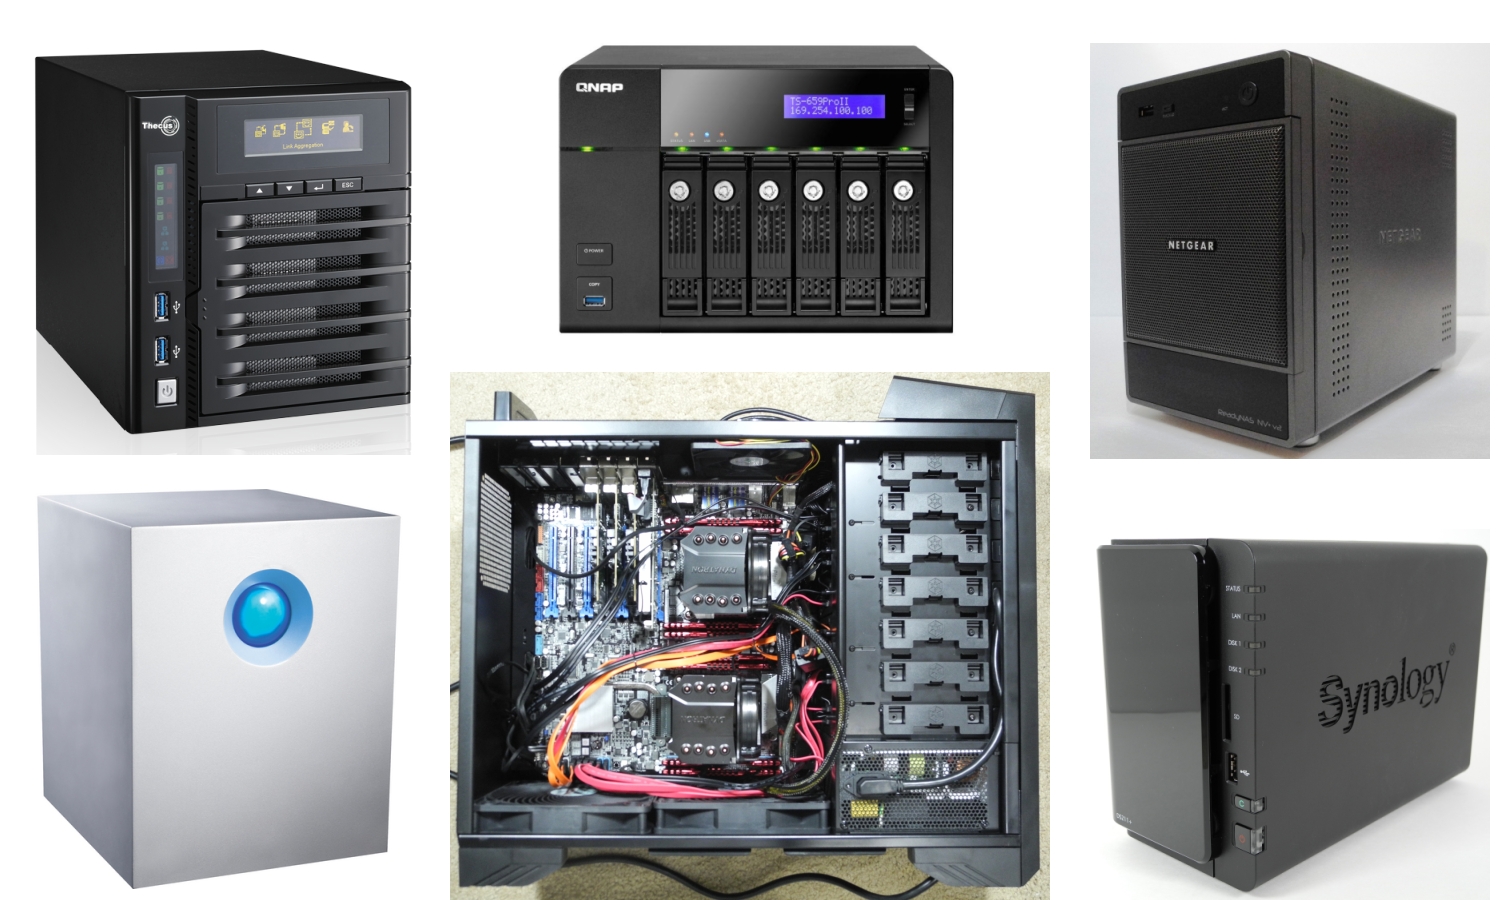
Following the discussion of the hardware aspects, we have a section on the software infrastructure. This includes details of the host and guest operating systems, the benchmarking software and scripts used in the testing process. We initially gave a trial run of the new test components on two different NAS units, the Synology DS211+ and the Thecus N4800. Results from the new test components are presented in the two sections preceding the concluding remarks.
Motherboard
A number of vendors exist in the dual processor workstation motherboard market. At the time of the build, LGA 2011 Xeons had already been introduced, and we decided to focus on boards supporting those processors. Since we wanted to devote one physical disk and one network interfaces to each VM, it was essential that the board have enough PCI-E slots for multiple quad-ported server NICs as well as enough native SATA ports. For our build, we chose the Asus Z9PE-D8 WS motherboard with an SSI EEB form factor..
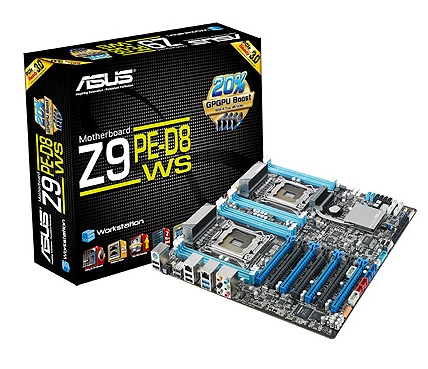
Based on the C602 chipset, this dual LGA 2011 motherboard supports 8 DIMMs and has 7 PCIe 3.0 slots. The lanes can be organized as (2 x16 + 1 x16 + 1x8 or 4 x8 + 1x16 + 1 x8). All the slots are physically 16 lanes wide. The Intel C602 chipset provides two 6 Gbps SATA ports and eight SATA 3 Gbps ports. A Marvell PCIe 9230 controller provides four extra 6 Gbps ports making for a total of 14 SATA ports. This allows us to devote two ports to the host OS of the workstation and one port to each of the twelve planned VMs. The Z9PE-D8 WS motherboard also has two GbE ports based on the Intel 82574L. Two Gigabit LAN controllers are not going to be sufficient for all our VMs. We will address this issue further down in the build.


The motherboard also has 4 USB 3.0 ports, thanks to an ASMedia USB 3.0 controller. The Marvell SATA - PCIe bridge and the ASMedia USB3 controller are connected to the 8 PCIe lanes in the C602. All the PCIe 3.0 lanes come from the processors. Asus also provides support for SSD caching (where any installed SSD can be used as a cache for frequently accessed data, without any size limitations) in the motherboard. The Z9PE-D8 WS also has a Realtek ALC898 HD audio codec, but neither of the above aspects are of relevance to our build.
CPUs
One of the main goals of the build was to ensure low power consumption. At the same time, we wanted to run twelve VMs simultaneously. In order to ensure smooth operation, each VM needs at least one vCPU allocated exclusively to it. The Xeon E5-2600 family (Sandy Bridge-EP) has CPUs with core counts ranging from 2 to 8, with TDPs from 60 W to 150 W. Each core has two threads. Keeping in mind the number of VMs we wanted to run, we specifically looked at the 6 and 8 core variants, as two of those processors would give us 12 and 16 cores. Within these, we restricted ourselves to the low power variants. These included the hexa-core E5-2630L (60 W TDP) and the octa-core E5-2648L / E5-2650L (70 W TDP).
CPU decisions for machines meant to run VMs have to be usually made after taking the requirements of the workload into consideration. In our case, the workload for each VM involved IOMeter and Intel NASPT (more on these in the software infrastructure section). Both of these softwares tend to be I/O-bound, rather than CPU-bound, and can run reliably on even Pentium 4 processors. Therefore, the per-core performance of the three processors was not a factor that we were worried about.

Out of the three processors, we decided to go ahead with the hexa-core Xeon E5-2630L. The cores run at 2 GHz, but can Turbo up to 2.5 GHz when just one core is active. Each core has a 256 KB L2 cache, with a common 15 MB L3. With a TDP of just 60W, it enabled us to focus on energy efficiency. Two Xeon E5-2630Ls (a total of 120W TDP) enabled us to proceed with our plan to run 12 VMs concurrently.
Coolers
The choice of coolers for the processors is dictated by the chassis used for the build. At the start of the build, we decided to go with a tower desktop configuration. Asus recommended the Dynatron R17 for use with the Z9PE-D8 WS, and we went ahead with their suggestion.

The R17 coolers are meant for the LGA 2011 sockets for 3U and above rackmount form factors as well as tower desktop and workstation solutions. They are made of aluminium fins with four copper heat pipes. A thermal compound is pre-printed at the base. Installation of the R17s was quite straightforward, but care had to be taken to ensure that the side meant to mount the cooler’s fans didn’t face the DIMM slots on the Z9PE-D8 WS.
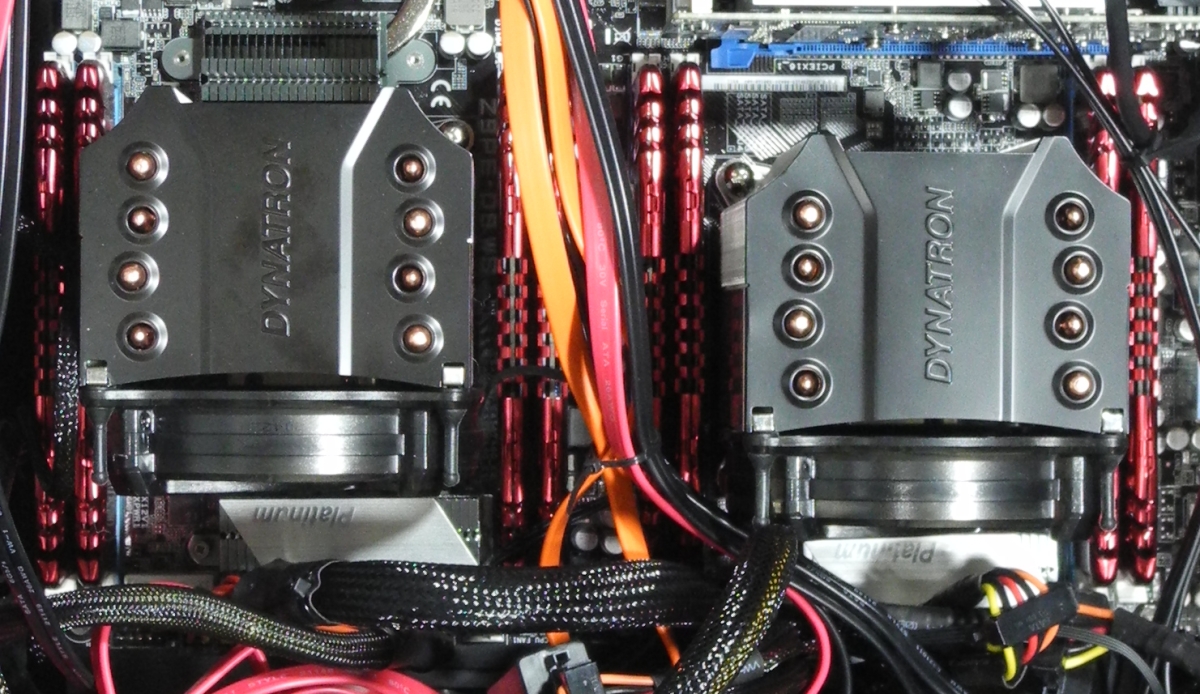
The fans on the R17 operate between 1000 and 2500 rpm, and consume between 0.96W and 3W at these speeds. Noise levels are respectable and range from 17 dbA to 32 dbA. The R17 has the ability to cool CPUs with up to 160W TDP. The 60W E5-2630Ls were effectively maintained between 45C and 55C even under our full workloads by the Dynatron R17s.
Memory
The eight DIMM slots in the Z9PE-D8 WS allow up to 64GB of DRAM. Intel NASPT (one of our anticipated VM workloads) requires a minimum of 1GB of DRAM and doesn’t really like 4GB (as it introduces caching effects and leads to anomalous benchmarking results). Even low end clients in SMB environments come with a minimum of 2GB of DRAM nowadays, and hence, we decided to go with 2GB of DRAM for each VM. As SMB NAS speeds approach 200 MBps, it is sometimes necessary to have data sources and sinks capable of handling such speeds for file transfer tests. One option would be to have a really fast SSD or SSDs in RAID0. However, this introduces unnecessary extra variables into the mix. A RAM disk makes for a better solution, and in our build, also acts as a common storage resource for multiple VMs.
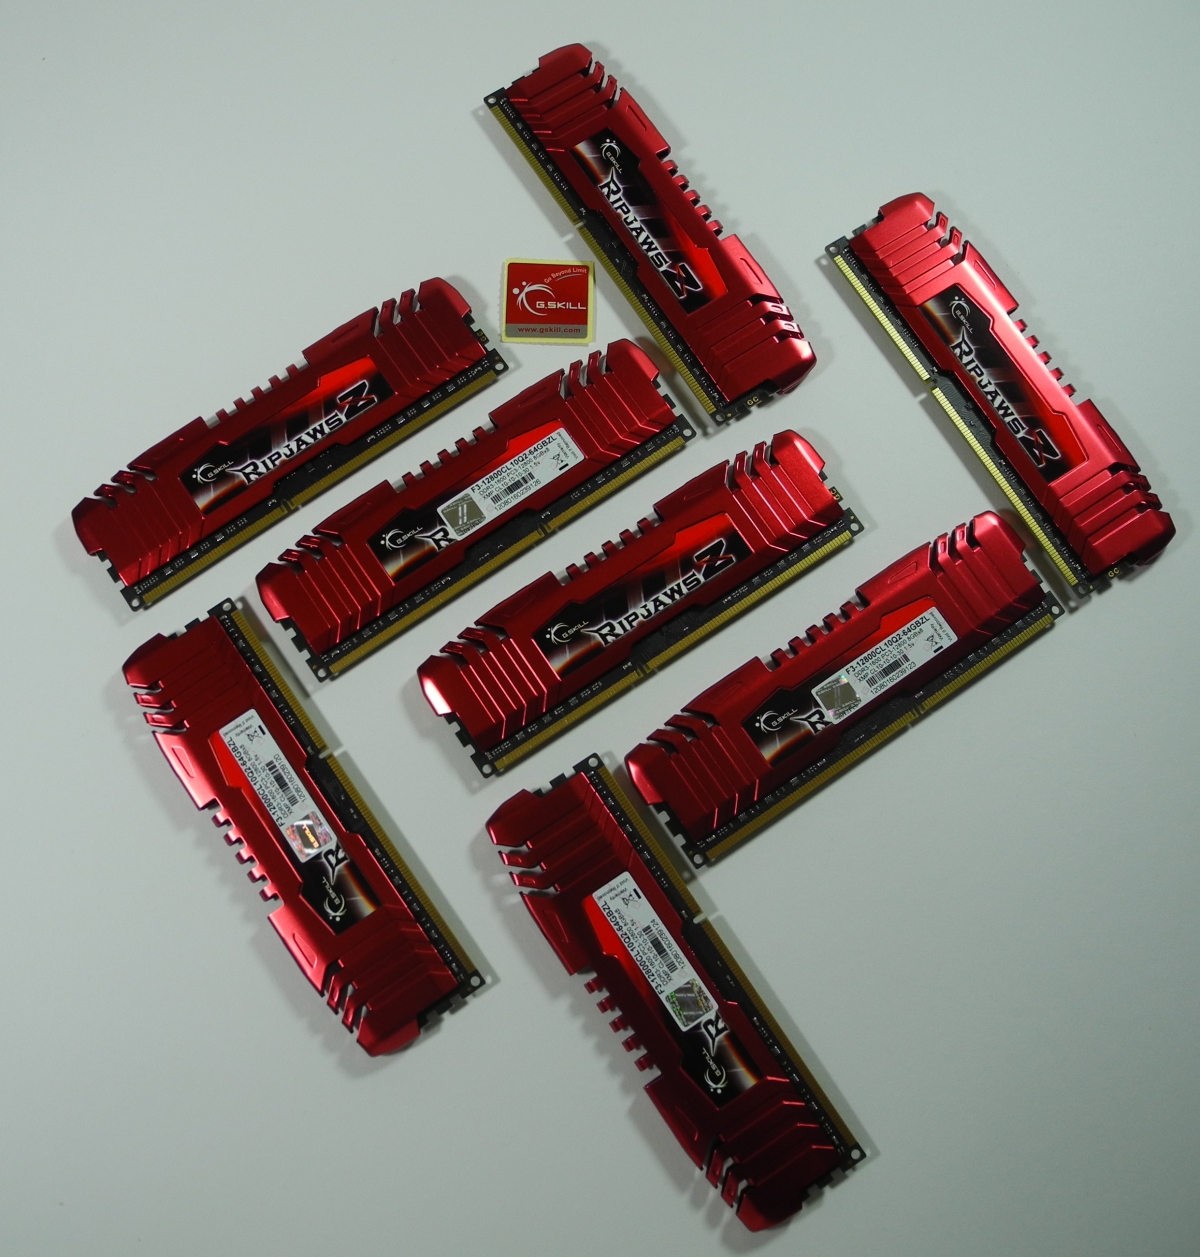
Keeping the above factors in mind, we decided to max out the capabilities of the Z9PE-D8 WS by installing 64GB of DRAM. We used G.Skill’s RipjawsZ F3-12800CL10Q2-64GBZL (8Gx8) modules. This quad-channel DDR3 kit is rated for operation at 1.5V and 1600 MHz with a CAS latency of 10-10-10-30. For our application, no overclocking was necessary. The Z9PE-D8 WS BIOS actually set it to 1333 MHz by default. We did find the performance at that setting to be good enough for our workloads, but decided to run the DIMMs at the native setting in the final configuration. Even though G.Skill targets the X79 platform, we had no trouble using it with the Z9PE-D8 WS. The combination of high capacity and efficiency made the G.Skill RipjawsZ a good choice for our testbed.
Storage
The storage subsystem is one of the most important aspects in a build meant to host multiple VMs concurrently. In our earlier NAS testbed, we used to run our VMs off a Seagate 2TB hard drive which had the host OS and the VMs in separate partitions. However, this is not a suitable solution for running multiple VMs concurrently. Hence, we made a decision to devote one physical disk to each VM. Fortunately, the Z9PE-D8 WS had 14 SATA ports.
Our planned workload doesn’t involve the storage of massive media files or any other such data which calls for hard disk drives in the testbed. The only exception is the robocopy test where we transfer a Blu-ray folder structure (with a size of 10.7GB) to the NAS and back. It is quite easy to handle that with a RAM disk, and hence, we decided to go with an SSD-only build.

We decided to equip the testbed with a 128GB OCZ Vertex 4 SSD for the host OS (Windows Server 2008 R2) and devote one 64GB OCZ Vertex 4 SSD to each VM. During the initial installation, we found that Windows Server 2008 R2 recommended at least 80GB of disk space for the primary partition. With the necessity to store temporary files for 12 VMs at the same time, we would have run the host OS SSD very close to full capacity. To resolve this, we installed another 128GB SSD to store the VM data and other necessary softwares.
The 128GB OCZ Vertex 4 provides up to 560 MBps / 430 MBps sequential read / write performance, and 90K / 120K IOPS for 4KB random reads and writes. At idle, the power consumption is 1.3W and it shoots up to 2.5W when fully active. These numbers remain the same for the 64GB OCZ Vertex 4. However, the sequential read / write performance drops down to 460 MBps / 220 MBps and the IOPS for 4K random reads and writes come in at 70K / 85K. Our aim in going with an SSD-only build was to make sure that the system’s storage subsystem didn’t end up being a bottleneck for our VMs. The much lower power consumption (compared to several distinct hard disk drives) ends up being an added bonus.
The Asus Z9PE-D8 WS has 2 GbE ports. However, we have several VMs trying to stress the NAS under test. Sharing two GbE links across 12 VMs was never going to be a suitable solution. The testbed used in earlier reviews had an Intel ESA-I340 quad-port GbE network adapter. Based on the Gigabit 82580, it has a PCIe 2.0 x4 connection enabling it to provide maximum bidirectional throughput for all the four GbE ports.
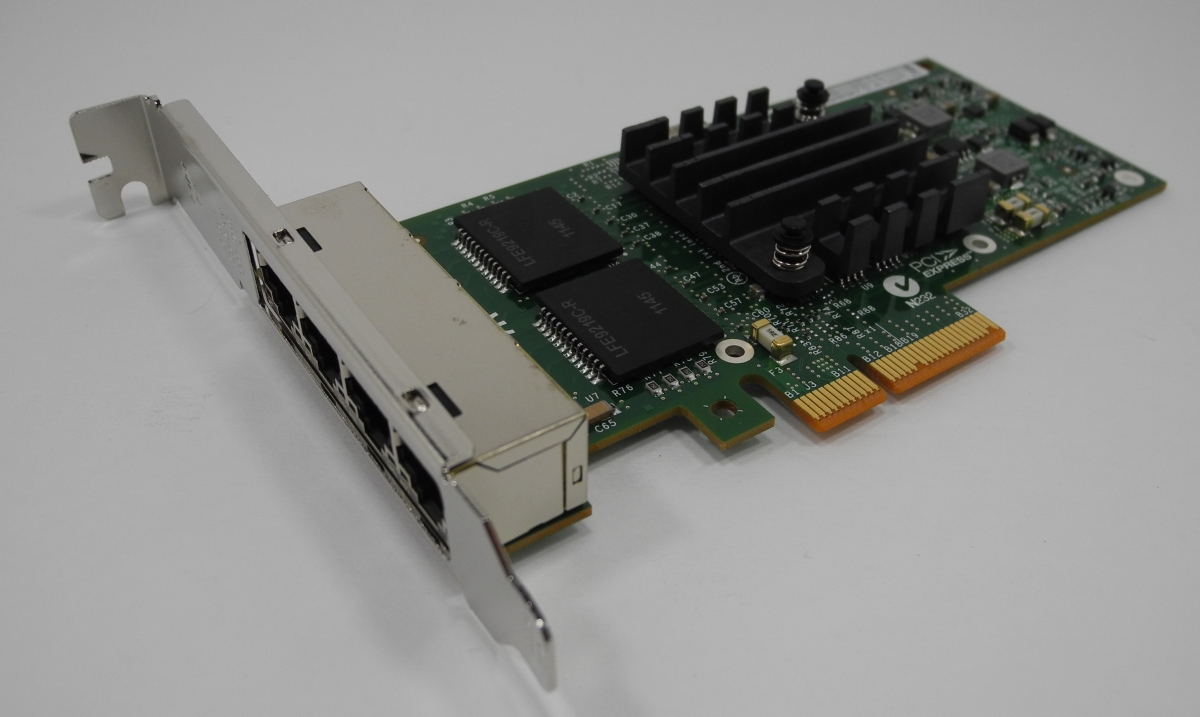
The Z9PE-D8 WS has 7 PCIe slots, and we decided to fill up three of them with the Intel ESA-I340 cards. They provided a total of twelve physical GbE ports, one for each VM. The ESA I-340 has a full height form factor, but also comes with a low profile bracket. One of the interesting aspects of the I340 server adapter is the VMDq (Virtual Machine Device Queue). It reduces I/O overhead in the hypervisor (and lowers CPU usage) by maintaining hardware queues for data packets sorted by their destination and sending them later to the hypervisor for forwarding to the appropriate VM. Even though we had the VMDq feature enabled in the settings for all the adapters, it probably had negligible effect on the CPU usage in our workloads because we had each VM reserving one port exclusively for its own use. The host machine itself connected to the network through one of the native GbE ports on the motherboard.
Between the NAS testbed and the NAS under test, it is essential that we have a switch capable of standing up to the stressful network traffic. Our switch of choice was one of the 24-port managed enterprise models from ZyXel, the GS2200-24. Even though it is advertised as a 24-port model, it actually has 4 extra ports with dual personalities (i.e, both copper and optical SFP).
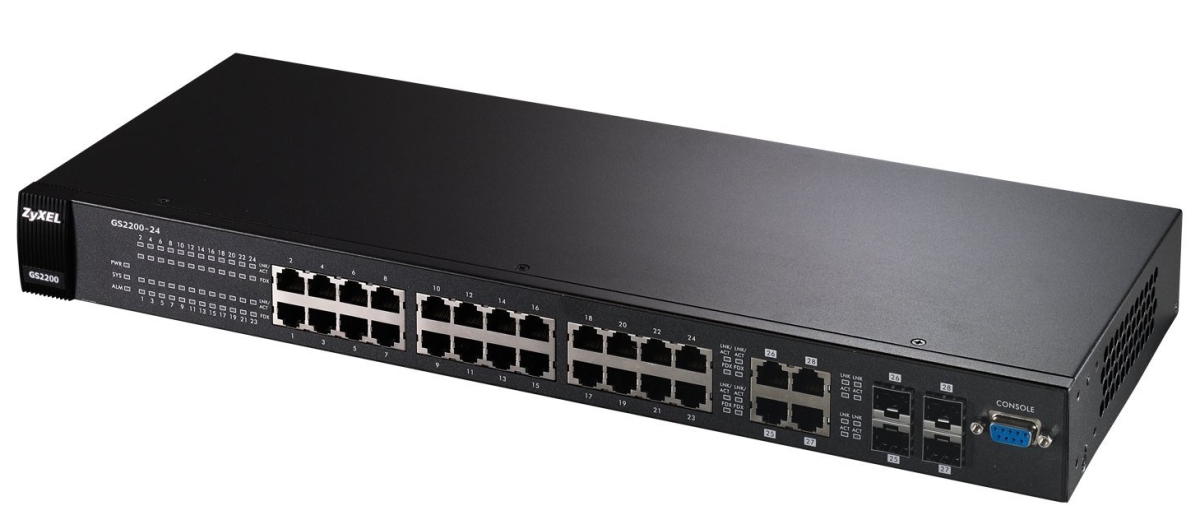
The switch has all the necessary features for an L2 managed model including VLANs, CoS/QoS, port trunking and bandwidth control. Port trunking / 802.3ad LACP aggregation is essential because NASes with dual GbE ports provide that as an option to increase performance. Even though a NAS might support link aggregation, it is of no use if the switch to which it is connected doesn’t aggregate the connected ports.
Cases meant to accommodate SSI EEB motherboards are few and far between. In addition to the motherboard size, we also had to make sure that the case could accommodate fourteen 2.5” SSDs. Our chassis of choice was the SilverStone Raven RV03.
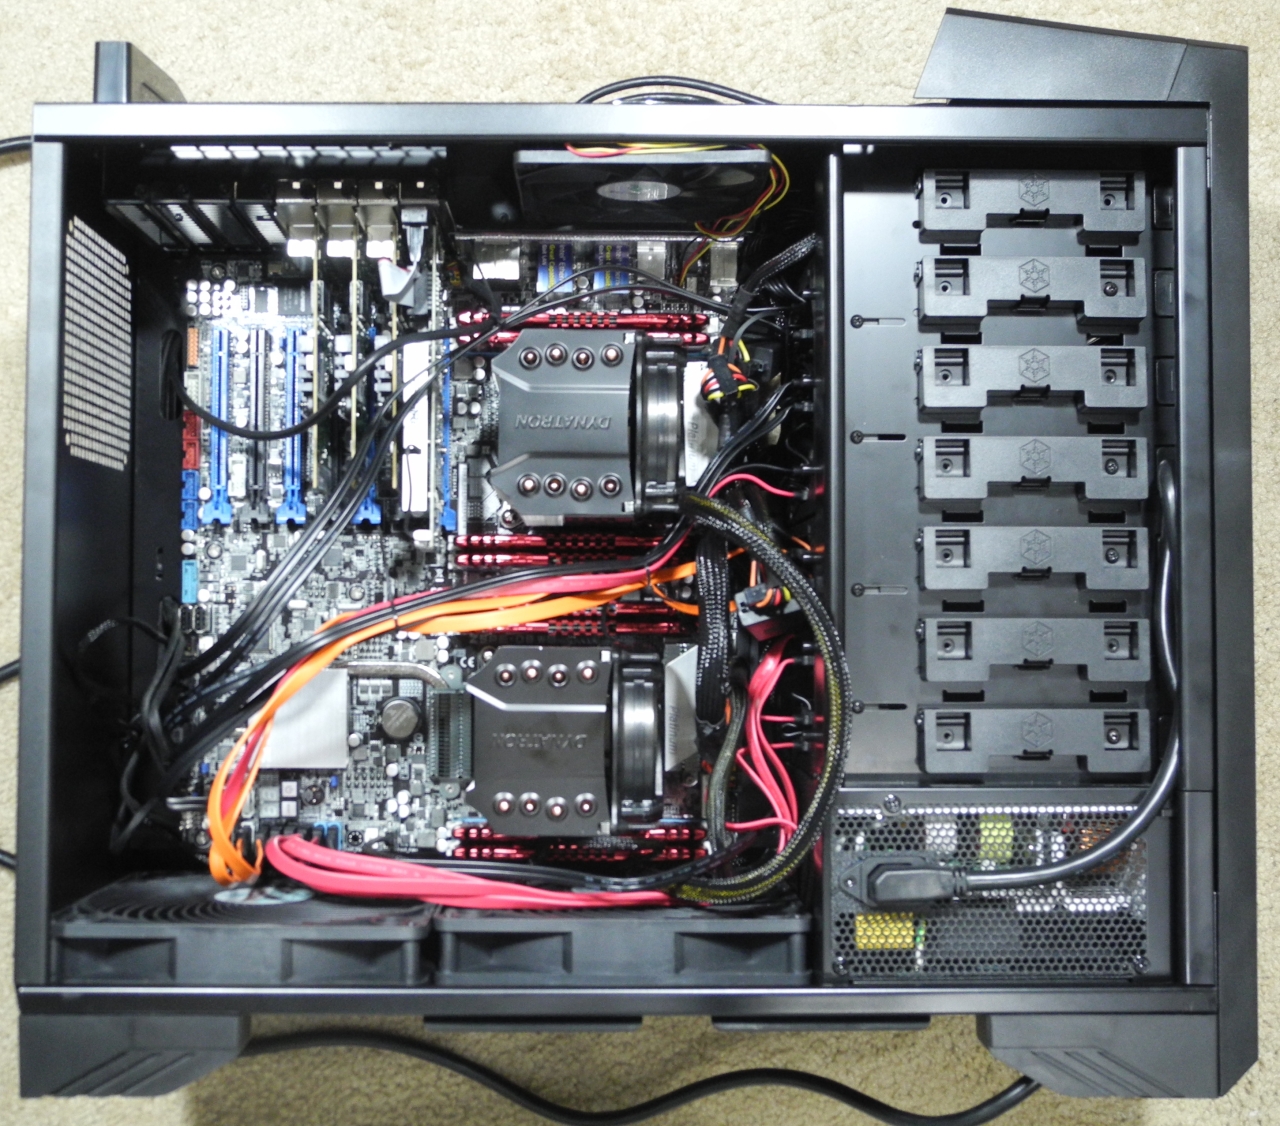
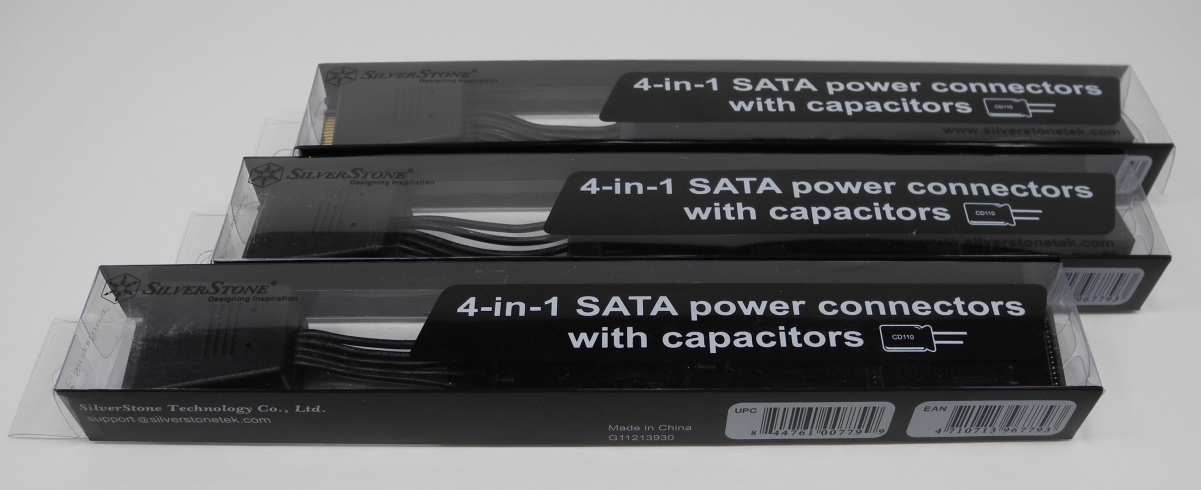
We also used several SilverStone’s dual 2.5” to 3.5” adapters and 4-in-1 SATA power connectors to place the fourteen 2.5” SSDs in the various available 2.5” / 3.5” / 5.25” slots in the chassis.

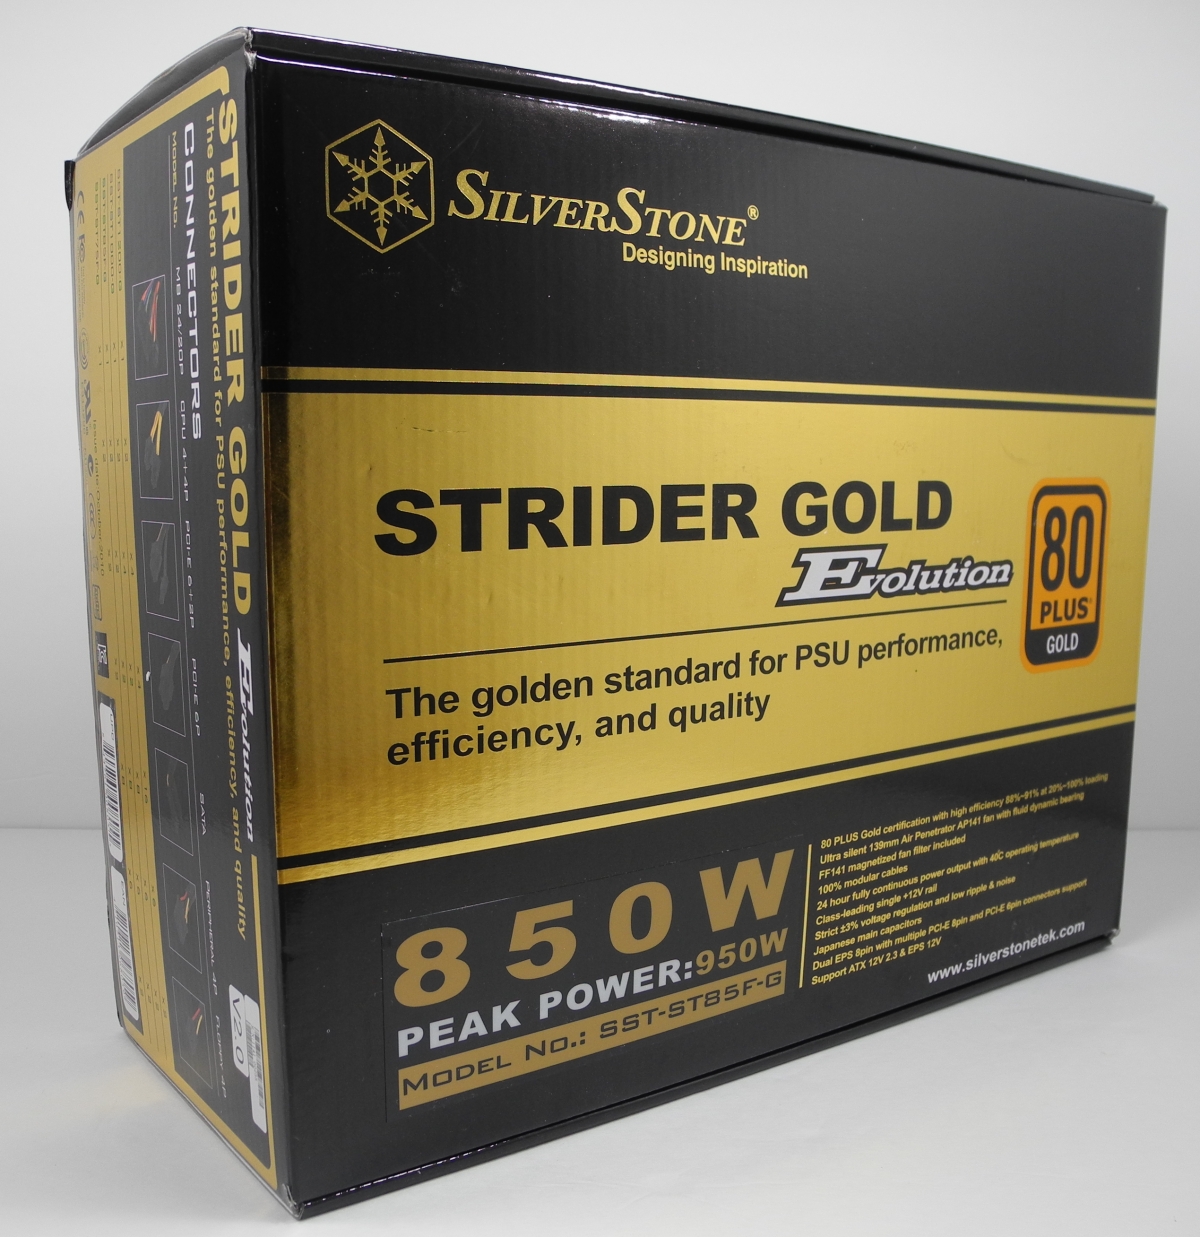
Rounding up the hardware side of the build, we have the SilverStone Strider Gold Evolution 850W power supply. Its modular nature ensured that cable management was never a hassle (considering that we didn’t require any of the external PCIe power cables since the server adapters didn’t need them). The PSU fan has fluid dynamic bearings for low noise. The PSU's internal fan speed controller adjusts the fan speed depending on temperature and loading conditions. A fan filter with magnets is also included to prevent dust build up inside the PSU.


We now move on to the software side of things.
The virtualization infrastructure in our testbed involved running Hyper-V on Windows Server 2008 R2. The benchmarking programs include IOMeter 1.1rc1 / Dynamo and Intel NASPT. While the former is used to test multi-client performance, the latter is used for testing the single client scenario. IOMeter itself runs on the host machine, while Dynamo instances run on each VM. Intel NASPT is run from one of the VMs only. Twelve guest machines were set up with similar configurations as below:
| 2012 AnandTech NAS Testbed Virtual Machine Configuration | |
| CPU | 1 vCPU |
| Memory | Static 2GB |
| IDE Controller 0 | Physical Disk X (64GB OCZ Vertex 4 SSD) |
| Network Adapter 0 | Local Area Connection X (ESA-I340 Port) |
| Network Adapter 1 | Internal Network |
| OS | Windows 7 Ultimate x64 |
Each VM gets one vCPU. By default, each VMs gets 2GB of RAM. However, when performing the robocopy tests to transfer a Blu-ray folder structure to and from the NAS, we choose to increase the amount of memory in that particular VM to 24GB (since only one VM is active in this case). This enables the creation of a RAM disk to house the folder structure (10.7GB). Under all scenarios, the host OS has a 32GB RAM disk mounted at startup. The RAM disks were created and mounted with Passmark Software’s free utility, OSFMount.
Two network interfaces are set up for each VM. While one of them connects to the NAS through one of the physical LAN ports provided by the Intel ESA-I340 and gets its IP address through DHCP in the 192.168.1.x subnet, the other is an internal network between the VMs and the host machine. With the host taking the static IP 10.0.0.1, each VM’s internal network interface is set up with a static IP of the form 10.0.0.x, with x between 2 and 13. The 32GB RAM disk mounted on the host is shared over this internal network for the VMs and the host to exchange information on the fly.
The guest OS on each of the VMs is Windows 7 Ultimate x64. The intention of the build is to determine how the performance of the NAS under test degrades when multiple clients begin to access it. This degradation might be in terms of increased response time or a decrease in available bandwidth. Both of these can be measured using IOMeter. While IOMeter is the controlling program installed in the host, each of the VMs run the Dynamo workload generator component. Dynamo and IOMeter communicate through the internal network to ensure that there is no effect on the benchmark runs.
Four distinct workloads corresponding to the storage performance evaluation metrics outlined here were set up to run on each machine. In the first pass, only the first VM runs the workload and reports the results. In the second pass, the first two VMs run the workload and report back and so on, till we conclude the IOMeter benchmark runs with all the twelve VMs running workloads simultaneously and reporting results. Fortunately, all the synchronization aspects are handled by IOMeter itself.
Manually running the dynamo process on each VM and restarting it after the completion of each pass is definitely a cumbersome process. To make things a little easier, we installed SSH servers on all the VMs. Bitvise SSH Server was our software of choice for the ease of use and configurability. After installing Strawberry Perl (on the host as well as all the VMs), we developed a small script to SSH from the host into each of the VMs in order, mount the NAS share and run Dynamo multiple times in sequence. The ICF files used in each of the twelve passes are available for download here.
In our review of the Western Digital Red hard drive, we used this testbed to fill up the NAS to varying levels. For this purpose, some files and folders were copied onto the RAM disk in the host which was shared over the 10.0.0.x internal network. This shared disk was mounted on all the VMs. A Perl script to copy over the contents from the mounted RAM disk (as many times as necessary to achieve a required fill percentage) to the NAS drive was processed. This simulates the NAS being subject to activity from multiple clients in the process of getting filled up.
In the next two sections, we will take a look at the sort of results that this testbed is able to provide us in terms of evaluating NAS performance.
Testbed in Action : Synology DS211+
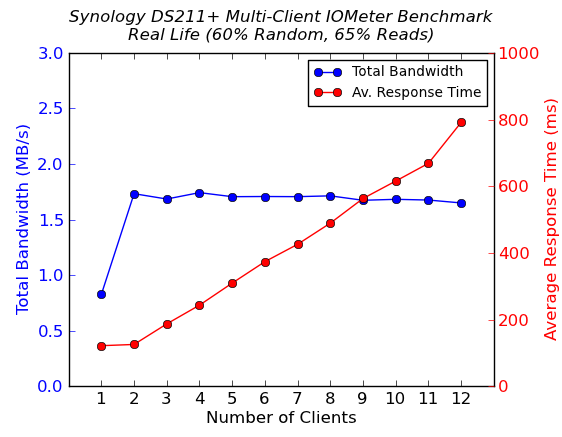
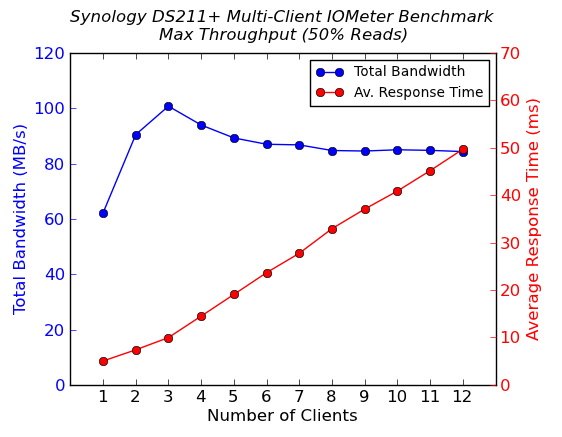
One of the first NAS units that we put through our new test suite was the Synology DS211+. The following four graphs show the total available bandwidth and the average response time while being subject to different types of workloads through IOMeter. IOMeter also reports various other metrics of interest such as maximum response time, read and write IOPS, separate read and write bandwidth figures, etc. Selected metrics from the evaluation of the Synology DS211+ are available here. The values corresponding to the points plotted below can also be seen in the above link.
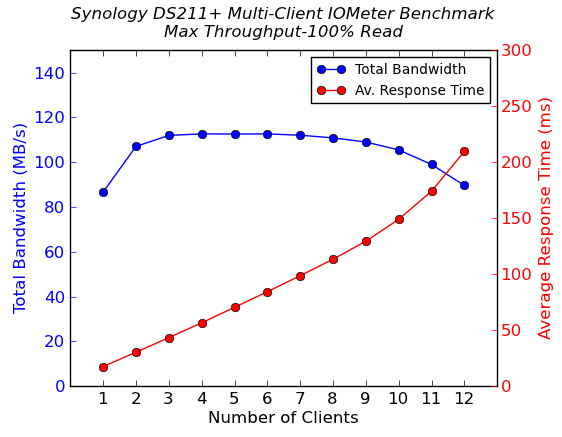

The first graph shows that the DS211+ is able to hit as high as 112.65 MBps in 100% sequential reads when five clients are simultaneously accessing the unit. However, for more than 7 clients, the total available bandwidth sees a decrease. In all the four cases, the average response time seems to increase only linearly. However, a look at the maximum response time in the above link shows that under some conditions, clients need to wait for as much as 10 seconds for a transaction to complete.
The Synology DS211+ seems to be a good fit for cases where there are 5 - 10 computers simultaneously accessing the unit, but performance seems to degrade with additional users.
Testbed in Action : Thecus N4800
We have been evaluating the Thecus N4800, a 4-bay NAS unit based on the Atom D2700, over the last couple of months. A full length detailed review is forthcoming, but we'll take this opportunity to present the results of the newly added test suite components for the N4800 with four disks in RAID5. The following four graphs show the total available bandwidth and the average response time while being subject to different types of workloads through IOMeter. IOMeter also reports various other metrics of interest such as maximum response time, read and write IOPS, separate read and write bandwidth figures etc. Selected metrics from the evaluation of the Thecus N4800 are available here.
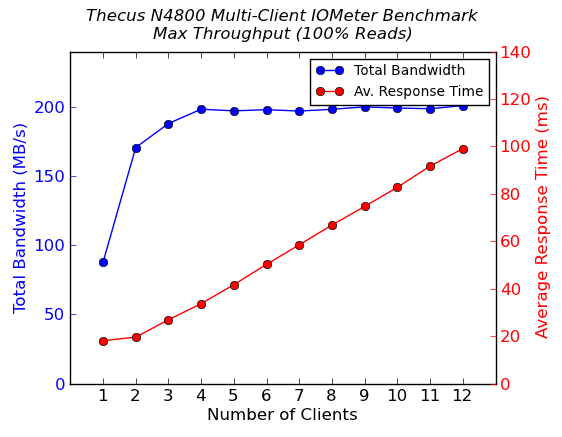
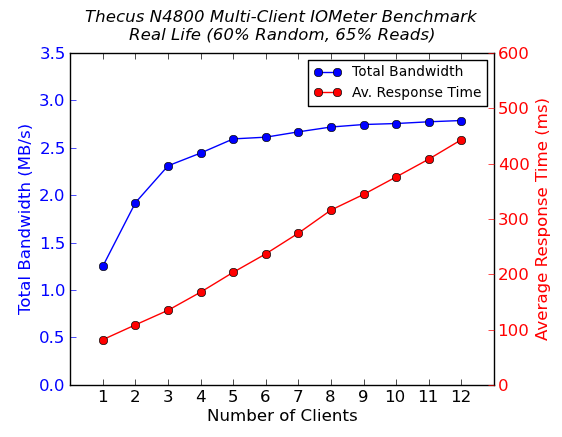
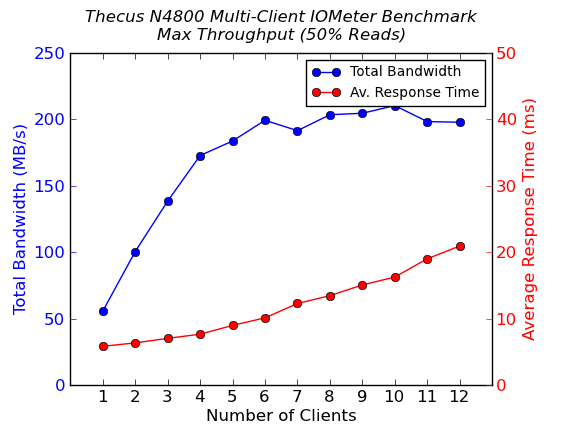
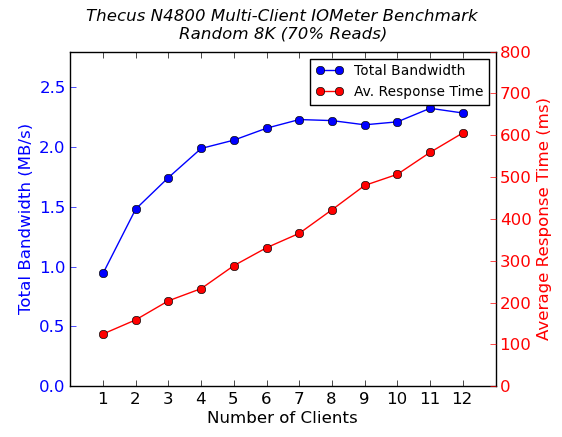
The full power of dual LAN ports with link aggregation is seen in these results, particularly for the 100% sequential read and 50% sequential read / 50% sequential write case. In the latter, we are able to hit as much as 210 MBps with ten clients active. The Thecus N4800 seems to hold up much better when compared to the Synology DS211+ as the number of clients increases. With just twelve simultaneous clients, we don't see a marked decrease in performance at any given node, unlike what we saw with the Synology DS211+ in the previous section. However, this is only to be expected because of the hardware configuration.
Concluding Remarks
The preceding two sections presented the results from the newly added test components using the new testbed. Standalone, they only tell a minor part of the story. In future reviews, we will plot results from multiple NAS units on a single graph (obviously, we won’t be putting the ARM/PowerPC based units against the Atom based ones) so as to get an idea of the efficiency and effectiveness of each NAS and its operating system.
Green computing was one of our main goals when building the testbed. The table below presents the power consumption numbers for the machine under various conditions.
| 2012 AnandTech NAS Testbed Power Consumption | |
| Idle | 118.9 W |
| 32GB RAM Disk + 12 VMs Idle | 122.3 W |
| IOMeter 100% Seq 100% Reads [ 12 VMs ] | 146.7 W |
| IOMeter 60% Random 65% Reads [ 12 VMs ] | 128 W |
| IOMeter 100% Seq 50% Reads [ 12 VMs ] | 142.8 W |
| IOMeter 100% Random 8K 70% Reads [ 12 VMs ] | 131.2 W |
Note that we were able to subject the NAS to access from twelve different clients running Windows for less than 13W per client. This sort of power efficiency is simply not attainable in a non-virtualized environment. We conclude the piece with a table summarizing the build.
| 2012 AnandTech NAS Testbed Configuration | |
| Motherboard | Asus Z9PE-D8 WS Dual LGA2011 SSI-EEB |
| CPU | 2 x Intel Xeon E5-2630L |
| Coolers | 2 x Dynatron R17 |
| Memory | G.Skill RipjawsZ F3-12800CL10Q2-64GBZL (8x8GB) CAS 10-10-10-30 |
| OS Drive | OCZ Technology Vertex 4 128GB |
| Secondary Drive | OCZ Technology Vertex 4 128GB |
| Other Drives | 12 x OCZ Technology Vertex 4 64GB (Offline in the Host OS) |
| Network Cards | 3 x Intel ESA I-340 Quad-GbE Port Network Adapter |
| Chassis | SilverStoneTek Raven RV03 |
| PSU | SilverStoneTek Strider Plus Gold Evoluion 850W |
| OS | Windows Server 2008 R2 |
Thank You!
We thank the following companies for making our NAS testbed build a reality:
- Thanks to Intel for the Xeon E5-2630L CPUs and the ESA I-340 quad port network adapters
- Thanks to Asus for the Z9PE-D8 WS dual LGA 2011 workstation motherboard
- Thanks to Dynatron for the R17 coolers
- Thanks to G.Skill for the RipjawsZ 64GB DDR3 DRAM kit
- Thanks to OCZ Technology for the two 128GB Vertex 4 SSDs and twelve 64GB Vertex 4 SSDs
- Thanks to SilverStone for the Raven RV03 chassis and the 850W Strider Gold Evolution PSU
What are readers looking for in terms of multi-client scenario testing in NAS reviews? We are open to feedback as we look to expand our coverage in this rapidly growing market segment.


